Whether you are looking to earn a first prize ribbon, or just want to make an easy homemade pie with thick, juicy blueberry filling, this impossibly flaky gluten-free blueberry pie deserves all the accolades! This recipe nails a flaky crust with my favorite gluten-free pie dough and uses an easy baking technique for a perfectly thickened filling, crackly lattice top, and golden brown bottom crust.
Clik here to view.

make a perfect GF blueberry pie – Top secrets Image may be NSFW.
Clik here to view.

Gluten-free diet or not, I won’t be stopped from enjoying a fresh, homemade blueberry pie. It’s what a crave most in these midsummer months. After researching many gluten-free blueberry pie recipes, it seems that one checking all the essential boxes was missing.
There are many things that make or break a homemade pie, but a golden, flaky crust is paramount to all my favorite GF pie recipes. What I find to be the biggest bummer when working with GF dough and fruit fillings is a soggy bottom crust.
Once the magic formula came together on this double crust gluten-free apple recipe, I took the simple techniques and ran with it. What’s the secret? Baking GF pies on a preheated metal baking sheet radiates heat up so the bottom crust is crisp and flaky, whether making savory recipes, like this 5-star gluten-free chicken pot pie, or other high-moisture blueberry fillings.
The other crucial piece? Achieving a gluten-free blueberry pie filling that sets up and slices without runny, disappointing results. This all lies in using the ideal gluten-free thickener for fruit pie fillings.
Most GF pie recipes gravitate towards cornstarch, but with some research I discovered instant tapioca had more consistent results, and isn’t that always the goal?
Cornstarch’s thickening power is released once it hits boiling point as it bakes. But, it also has a tendency to break down, meaning a greater chance of a thin, runny filling. Acids, like lemon juice, or over baking can also cause this.
Instant tapioca, on the other hand, is more of a sure thing. As it heats it absorbs the liquid, and creates a thick, sticky blueberry sauce. It’s naturally gluten-free, breaks down clear so the juicy blueberries shine through, and sets into a nice, sliceable texture.
I can really geek out over my favorite gluten-free blueberry pie recipe techniques, so let me know if you have any questions in the comments below. We can bond over a heavenly slice of pie. Doesn’t that sound fun??
Clik here to view.

Ingredient Notes and Substitutions
If you are intimidated by making a blueberry pie with lattice crust completely from scratch, or need to find workable ingredient substitutions, read through the info below, including the step-by-step pics, descriptions and bonus tips. Image may be NSFW.
Clik here to view.
- Gluten-free pie crust – I use my favorite gluten-free pie dough (linked in the recipe below), but if you are looking for a shortcut, grab a two pre-made GF crusts from the freezer section, or use a dairy-free gluten-free crust, if needed. Shared below are alternative options, like a double crust or crumb topping.
- Blueberries – The recipe was tested using fresh blueberries, but frozen works as well. No need to defrost first, just mix the frozen blueberries in the filling and bake a few minutes longer to thicken.
- Sugar – If the blueberries are very sweet, cut back to 1/2 cup. The amount of sugar is completely adjustable to taste. If you prefer another granulated low sugar sweetener, this may also be substituted.
- Instant Tapioca – The gluten-free blueberry pie filling uses granulated tapioca. Tapioca pearls vary in size. Larger pearls will hold their shape, kind of like tapioca pudding, so that isn’t the best option. Look for tapioca labeled granulated, instant, or quick-cooking, which breaks down during baking. Using tapioca starch also works, but you will need to add 1/2 cup.
- Butter – I like to add a little bit of butter to fruit fillings to enhance the flavor. Trust me on this one. Game changer. Dairy-free butter also works.
Let’s Make This Together!
(Below shows step-by-step photos and modified instructions. For the complete recipe, along with ingredient amounts, scroll down to the recipe card.)
Start with the pie dough
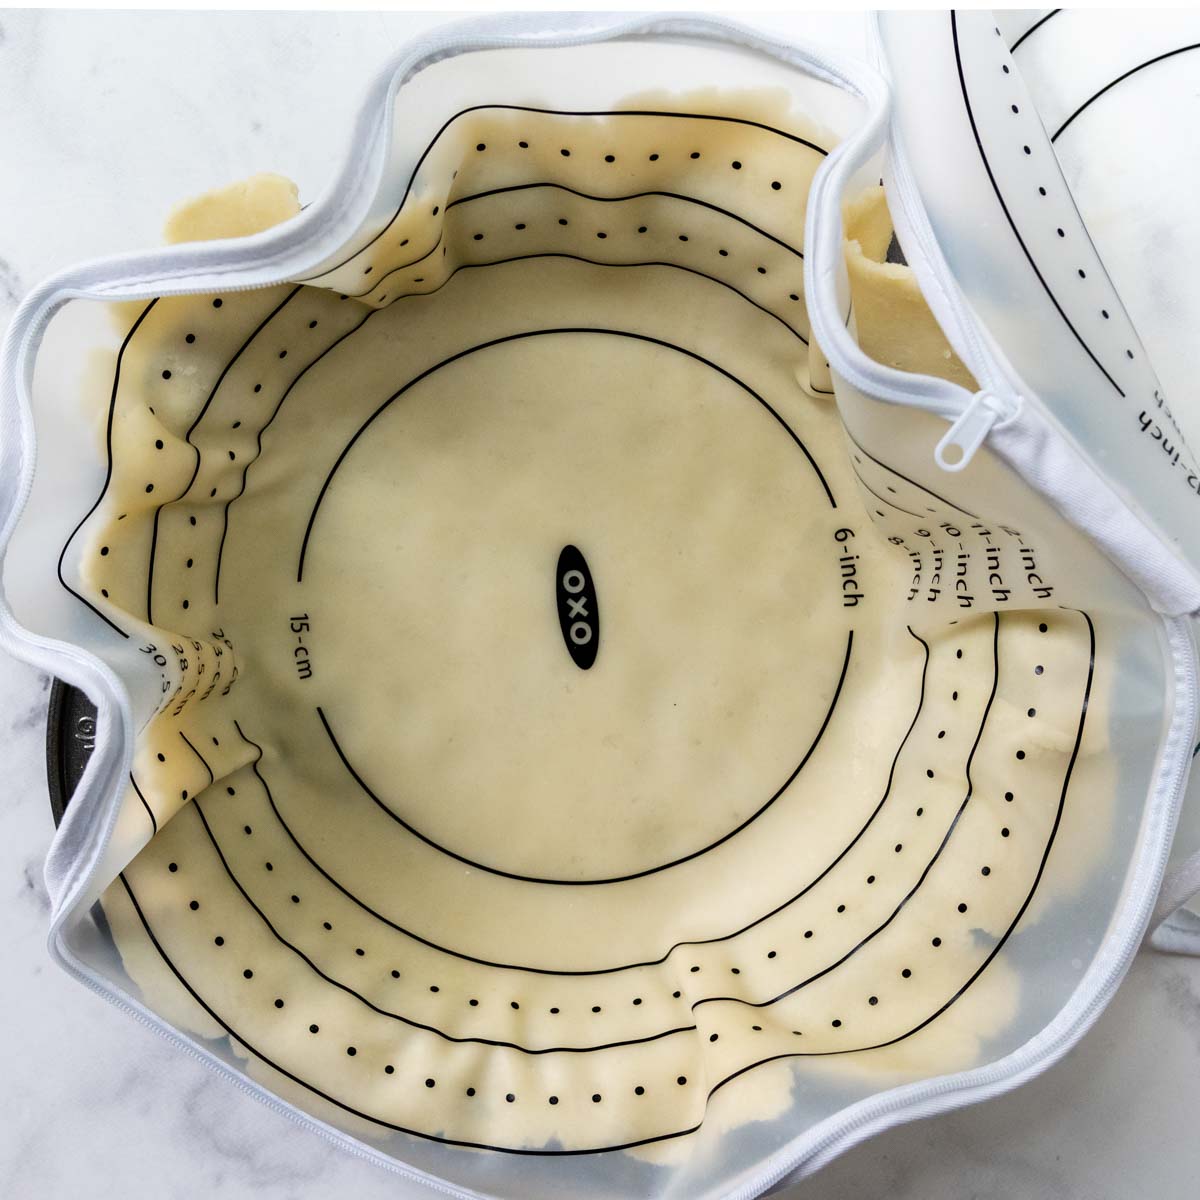
Once you have mixed together the dough (step-by-step details can be found in this easy gluten-free pie crust recipe, including my recommended gluten-free flour blend) using a pastry bag is the easiest way to roll out the dough, but between two sheets of parchment paper also works. Fit the bottom crust in a 9-inch pie pan.
Clik here to view.
Add the filling
Combine together the filling in a large mixing bowl – blueberries, sugar, tapioca, vanilla extract, lemon juice, and cinnamon. Pour into the chilled crust and then dot with the diced butter. While you roll out and cut the lattice crust, transfer the pie to the fridge because cold pies bake the flakiest!
Clik here to view.

Roll and cut Lattice top
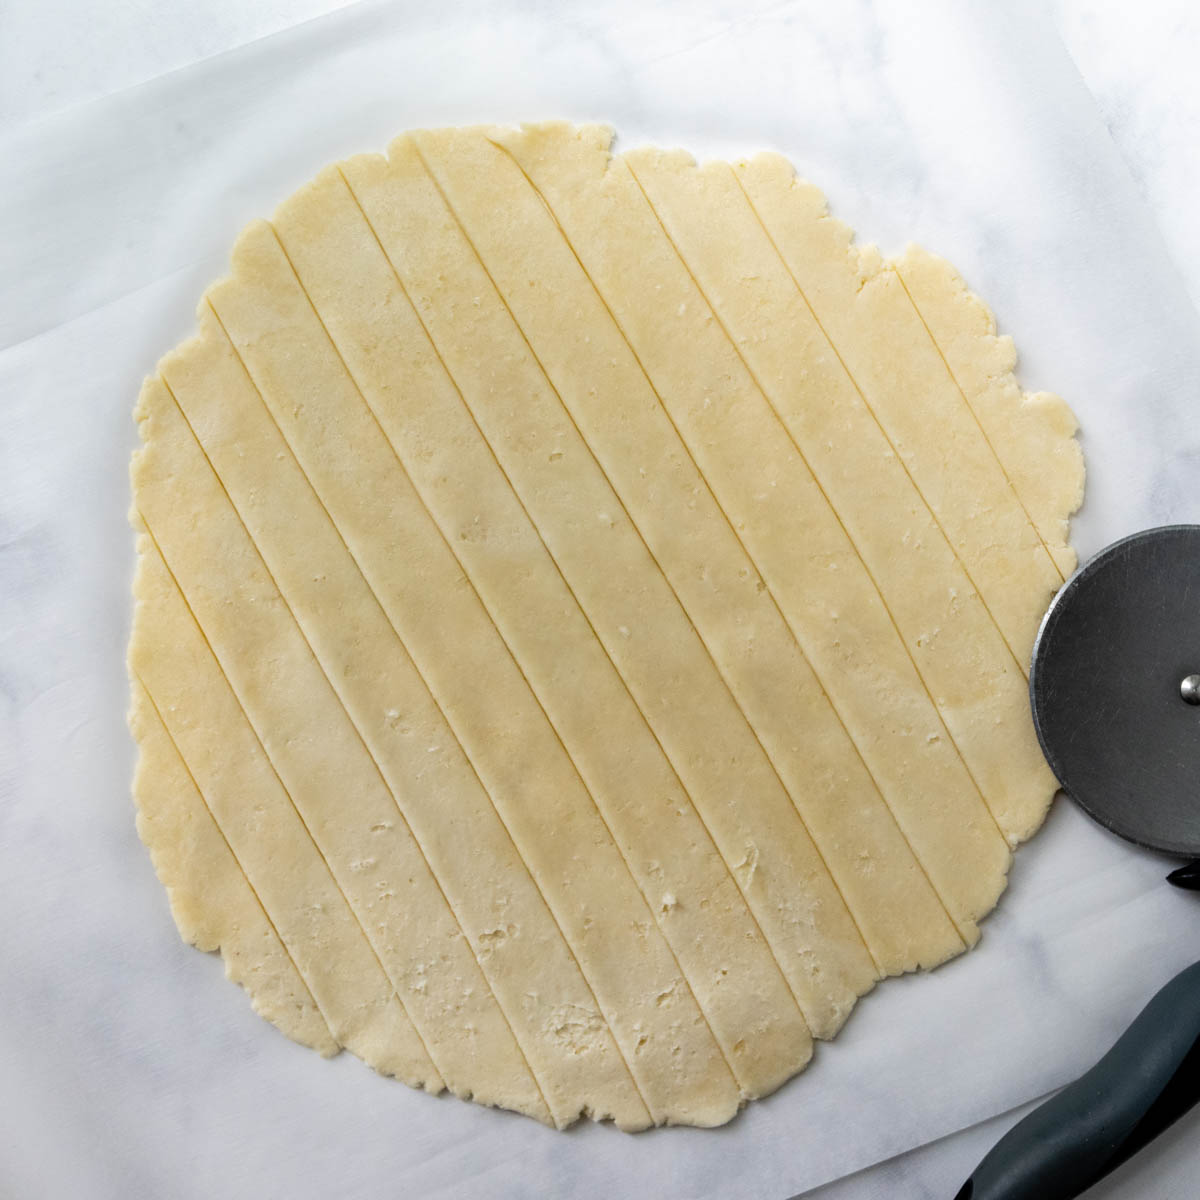
Roll the second pie dough into a 12-inch circle. If using a pastry bag, invert the rolled dough onto a sheet of parchment. Use a pizza cutter, pastry cutter, or knife to slice the dough into twelve 1-inch strips.
Clik here to view.
weave lattice crust
Lay 6 strips, evenly spaced, across the filling. Then comes the fun part! (Yes, this is my idea of fun.) Fold back 3 alternating strips almost all the way off of the pie. Take one unused strip and lay it right against where the strips are folded back. Return the strips back over the pie so they cover the strip just placed. Repeat folding back the alternating strips until all the strips are placed and you are super impressed with yourself.
Clik here to view.

Clik here to view.

Shape edge crust
Trim off any excess, then fold the dough edges under, sealing the lattice crust strips with the bottom crust, making sure the two crust are well sealed together. Use your finger and thumb to make a decorative edge. Remember, cold pies bake best, so freeze for 15 minutes before baking.
Clik here to view.

Clik here to view.

How to bake and know when it’s done
As you are assembling the pie, preheat the oven to 425ºF. Place a baking sheet, lined with parchment or foil, which will catch any drips. The baking sheet heats, along with the oven, to place the pie on. The metal conducts the heat better, which makes a crisp bottom crust.
Once the pie is chilled again, transfer the pie to the baking sheet and bake for 25 minutes. Keep the pie in, but lower the oven to 375ºF to finish baking the crust at a more gentle temp and thicken the filling.
How do you know when your blueberry pie is done? It will start to bubble, first around the edges, then a little bit further in. Wait until it bubbles more towards the center so you know it’s hot throughout. Since it has a longer bake time, cover the edges with a pie shield and even loosely tent foil over the top.
Now’s the hardest part. Waiting. To have a sliceable pie, it has to cool at least 3 hours, but I say waiting 4 hours is even better. The pie will still be slightly warm and absolutely heavenly with a scoop of vanilla ice cream on top.
Who Doesn’t love options?
If you would rather not make a lattice crust, there are some other options as well. One would be to make a double crust, rolling out a second top crust and fitting on top. Seal the edges together, flute the edge and slit 3-4 times to allow steam to escape. The baking times are the same.
Not feeling a top crust? Use the crumb topping recipe from this fresh gluten-free strawberry pie recipe. Follow the baking instructions on the recipe and you can even add a little of the crumb topping to the filling for extra structure.
Clik here to view.

Save this recipe for Gluten-free blueberry pie to your pinterest board!
Let’s be friends on Pinterest! I’m always sharing great recipes!
Did you make this recipe? I love hearing from you! Leave a star rating and comment below the recipe card. It helps others when searching for recipes and I appreciate feedback from our community. You will always hear back from me! -Melissa
Clik here to view.

Blue Ribbon Gluten-Free Blueberry Pie with Flaky Crust
Ingredients
Gluten-Free Lattice Crust
- 2 sticks (226 g) unsalted butter cut into cubes and frozen for 10 minutes
- 5 tablespoons ice water
- 3 tablespoons sour cream
- 3 teaspoons apple cider vinegar
- 2 ½ PLUS ⅓ cup (416 g) gluten free flour I highly recommend Cup4Cup gluten-free flour
- 3 teaspoons granulated sugar
- 1 teaspoon salt
Gluten-Free Blueberry Filling
- 6 cups (1.14 kg) blueberries about 3 ½ pints
- ⅔ cup (134 g) granulated sugar
- ¼ cup (48 g) instant granulated tapioca
- 1 tablespoon lemon juice
- 2 teaspoons vanilla extract
- ¼ teaspoon ground cinnamon
- ¼ teaspoon salt
- 1 tablespoon (14 g) cold butter diced
- eggwash: 1 egg whisked with 1 tbsp milk
- optional coarse sugar for sprinkling on crust
Instructions
Gluten-Free Double Crust
- Place the cubed butter in the freezer for 10 minutes. Mix together the cold water, sour cream, and vinegar in a small bowl. Place the liquids bowl in the refrigerator until you are ready to use.2 sticks (226 g) unsalted butter, 5 tablespoons ice water, 3 tablespoons sour cream, 3 teaspoons apple cider vinegar
- FOOD PROCESSOR: Pulse flour, sugar, and salt together until mixed.BY HAND: Whisk dry ingredients in medium-sized bowl.2 ½ PLUS ⅓ cup (416 g) gluten free flour, 3 teaspoons granulated sugar, 1 teaspoon salt
- FOOD PROCESSOR: Process the butter into the flour mixture until well incorporated, evenly dispersed, and without large chunks.BY HAND: Use a pastry blender, fork, or fingers to cut and knead butter into the dough until it is well incorporated throughout.
- FOOD PROCESSOR: Add the liquids to the food processor and pulse until the flour becomes moistened and small dough clumps appear. If dough doesn't start to come together, add a touch more cold water. BY HAND: Add half the liquids and knead with fingers or a fork. Pour in the remaining liquids. Knead until the dough starts to come together and the liquids are well mixed with flour.TIP: To check if you have enough liquid, clump and flatten a small bit of dough. If it doesn’t stick together, is crumbly, or breaks apart easily, add a small dash of ice water. Pulse a few times and recheck. If the dough is too wet or sticky, add a dash of flour. Pulse a few times and recheck.
- Divide the dough between 2 large sheets of plastic wrap and flatten into a thick 1" disk. Wrap tightly and refrigerate for at least 1 hour or freeze for 30 minutes.
Blueberry Filling
- After the pie dough has chilled, prepare the filling. In a large bowl combine the blueberries, sugar, tapioca, lemon juice, vanilla, cinnamon, and salt. (The 1 tbsp butter will be used when filling the pie.) Let the mixture sit at room temp for at least 10 minutes while the crust is rolled out.6 cups (1.14 kg) blueberries, ⅔ cup (134 g) granulated sugar, ¼ cup (48 g) instant granulated tapioca, 1 tablespoon lemon juice, 2 teaspoons vanilla extract, ¼ teaspoon ground cinnamon, ¼ teaspoon salt
Shaping Crust and Baking
- Preheat the oven to 425ºF. Place a baking sheet, lined with parchment paper or foil, on the middle rack. The baking sheet heats, along with the oven, to place the pie on. The metal conducts the heat better, which makes a crisp bottom crust. The foil or parchment catches drips, saving you clean up!
- To roll the pie dough, lay a large piece of parchment paper on your workspace. Place one unwrapped dough disc in middle and place same sized sheet on top. Alternatively, use the pastry rolling bag pictured in the post. Use a rolling pin to press and spread out down from the middle out. Roll out into a circle slightly larger than your pie dish, about 11-12 inches.
- Remove the top paper, and invert into pie dish. Press the dough to fit securely against the pie plate. Remove the second paper. Tip: If the dough warmed while rolling, it may be trickier to take the paper off. If this happens, leave the paper on, and stick the whole thing in the fridge for 5-10 minutes. Once the crust is chilled again it's much easier to pull off the paper.
- Pour the pie filling in the bottom crust. Scatter the diced butter pieces over the top and place the pie in the fridge while you repeat the rolling process with the top crust.1 tablespoon (14 g) cold butter
How to Make Lattice Crust
- Roll out the second disc into a 12-inch circle. If using the pastry rolling bag, invert the rolled crust onto a piece of parchment paper for cutting. Use a pizza cutter or knife to slice the dough in twelve 1-inch strips. Lay 6 strips, evenly spaced, across the pie. Use the shorter strips at the ends, longer strips towards the middle.
- Fold back 3 alternating strips almost all the way off of the pie. Take one unsused strip and lay it right against where the strips are folded back. Return the strips back over the pie so they cover the strip just placed.
- Fold back the other 3 vertical strips. Take another usused strip and lay it against where the strips are folded back. Return the vertical strips back over it. You will start to see the woven pattern. Repeat process with remaining strips.
- Trim any excess dough from the edges, then fold the dough under, securely sealing the lattice crust strips with the bottom crust. Use your finger and thumb to make a decorative edge. Freeze the pie for 15 minutes before baking.
Baking Instructions
- After the pie has chilled in the freezer, brush on the egg/milk mixture on the top crust and edges to make a shiny crust. Sprinkle with the optional coarse sugar.eggwash: 1 egg whisked with 1 tbsp milk, optional coarse sugar
- Use a pie shield to protect the edges or shield with strips of foil circled around. Place the pie directly on the heated baking sheet. Bake for 25 minutes.
- Leave the pie in the oven, but lower the temperature to 375℉. If the crust is becoming too browned, loosely tent a piece of foil over the top. Continue to bake for 40-50 minutes, or until the juices start to bubble throughout the vents.
- Cool the pie on a wire rack for at least 4 hours before slicing. This allows enough time for pie to cool and the sauce to set. It's best served the same day or see recipe notes for make-ahead tips.
Notes
Make-Ahead and Storage Tips
For maximum flakiness, enjoy the day it is made. The crust becomes softer after 24 hours as it absorbs the moisture from the blueberries. When storing leftovers, leave at room temperature and loosely tent foil over the top, not securely, so moisture can escape. Enjoy within 3 days, but the crust will became softer on days 2 and 3. For a make-ahead blueberry pie, follow the recipe for assembly until right before baking. Freeze until solid and then wrap securely with plastic wrap and foil. Return to freezer up to 2 months. When ready to serve, bake directly from frozen, do not thaw. Unwrap the pie and bake as directed with the preheated baking sheet. Once the oven temperature is lowered, it will required about 10-20 minutes additional baking time. Be sure the edges are covered with a pie shield and foil loosely tented over the top.Nutrition
This post contains affiliate links. My opinions are always my own. If you purchase a product through an affiliate link, I make a small commission – at no cost to you. Read full disclosure policy here.
The post Blue Ribbon Gluten-Free Blueberry Pie with Flaky Crust appeared first on MamaGourmand.